Even the most fundamental SOLIDWORKS tasks can leave you stumped when there are so many ways to complete them. Knowing how to make a cone is one of those tasks that, depending on how you were trained, you may approach it differently.
We’ll review the three most common ways to make a cone in SOLIDWORKS, so you have a solid foundation for your next modeling challenge. As with all things in 3D CAD, choose the best method that fits your application.
Using an Extrude with Draft
One of the first ways people tend to make a cone is by using a Boss Extrude on a sketch and applying a draft angle for the final shape.
- Start with a circular sketch on any plane and fully define it with dimensions or relations.
- Select the Extruded Boss/Base command from the Features tab of the CommandManager.
- Specify the direction of the extrude and the depth.
 Using an Extrude feature to make a cylinder
 - Select the Draft checkbox in the PropertyManager.
- Begin to adjust the angle of the draft to taper your cylinder into a cone.
 Adding draft to make a cone shape
 - Select the green check to finalize the operation.
This method can also help you to produce a truncated cone, or a cone with the top cut off, if so desired. The biggest drawback of this method is that, unless you do some math ahead of time to determine the required height, you will have little control over the cone’s overall height.
If you prefer more precision when modeling, you’re likely to find the next two methods are a better fit for you.
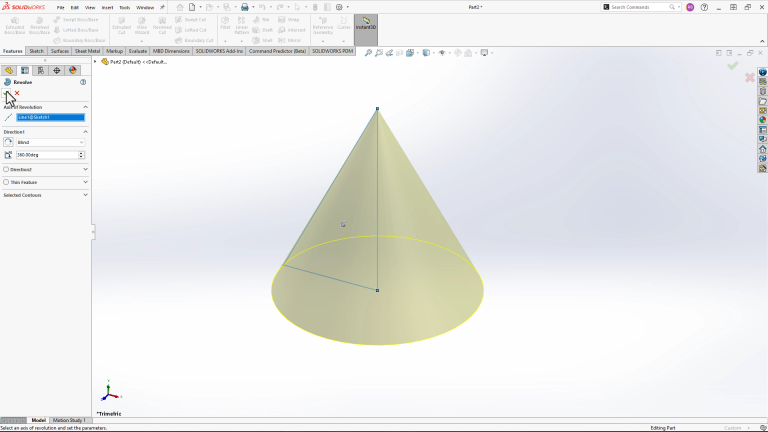
Using a Revolved Feature
The more common method for making a cone is using a Revolved Boss to have a greater degree of control over the final dimensions.
- Start a triangular sketch on any plane and fully define it using dimensions and relations.
 Creating a triangular sketch that is half the diameter of the cone
 - Select the Revolved Boss/Base command from the Features tab of the CommandManager.
 A preview of the revolved cone
 - Select the green check to finalize the operation.
 A completed cone in SOLIDWORKS
Using a Loft to a Point
The final method of making a cone is to use a Lofted Boss. This will allow you to control the dimension of the cone using two sketches placed on two different planes.
- Start with a circular sketch on any plane and fully define it with dimensions or relations.
- Create an offset plane using the original sketch plane as the first reference. The offset distance will be the height of the final cone.
 Creating an offset sketch plane
 - On the new plane, create a single sketch point at the center of the previous circular sketch.
- Select the Lofted Boss/Base command from the Features tab of the CommandManager.
- Use both sketches as the loft profiles in the PropertyManager.
 A preview of the final cone created using a loft
 - Select the green check to finalize the operation.

Locking Down SOLIDWORKS Basics
The three methods discussed above are the three most common ways we see clients make a cone in SOLIDWORKS. However, this is not an exhaustive list of methods available to you.
Other techniques that apply to making cones or anything else in SOLIDWORKS are covered extensively during a certified, instructor-led training course hosted by one of our technical experts. Whether you’re just starting or have been using SOLIDWORKS for years, everyone can always solidify the fundamentals.
Not sure what training course you need? Take a free training evaluation here.
PakarPBN
A Private Blog Network (PBN) is a collection of websites that are controlled by a single individual or organization and used primarily to build backlinks to a “money site” in order to influence its ranking in search engines such as Google. The core idea behind a PBN is based on the importance of backlinks in Google’s ranking algorithm. Since Google views backlinks as signals of authority and trust, some website owners attempt to artificially create these signals through a controlled network of sites.
In a typical PBN setup, the owner acquires expired or aged domains that already have existing authority, backlinks, and history. These domains are rebuilt with new content and hosted separately, often using different IP addresses, hosting providers, themes, and ownership details to make them appear unrelated. Within the content published on these sites, links are strategically placed that point to the main website the owner wants to rank higher. By doing this, the owner attempts to pass link equity (also known as “link juice”) from the PBN sites to the target website.
The purpose of a PBN is to give the impression that the target website is naturally earning links from multiple independent sources. If done effectively, this can temporarily improve keyword rankings, increase organic visibility, and drive more traffic from search results.