DriveWorksXpress automates the generation of SOLIDWORKS models and drawings by creating variations of a master model.
 Variations of the Master Model
DriveWorksXpress Form
Once you have your master model, with all of the necessary information captured, you are ready to design your form. DriveWorksXpress uses data entered into a form to drive the dimensions, features, and custom properties of the master model. It does this by first copying the master model so that the master remains unchanged and a unique set of files is created for the specification.
When designing a form for a project, there are five types of input fields, aka form controls, available.
- Text Box
- Numeric Text Box
- Drop Down
- Spin Button
- Check Box

Creating a new input field and choosing the type
In some cases, choosing which input type is simply a matter of preference. For instance, a Numeric Text Box and a Spin Button both require numeric values, but Spin Buttons make entering data fun and are more visually appealing.

DriveWorksXpress Form
In other cases, the type of data being collected will determine which type of input field is appropriate. Imagine you are a door manufacturer and you offer doors with or without a pre-bored hole for the door knob. A Check Box input is perfect for this as it is a Yes or No value.
Use various types of input fields and choose the type that makes sense for each piece of data being entered. The number of input fields that can be added to a form is limitless.
Example DriveWorksXpress Project
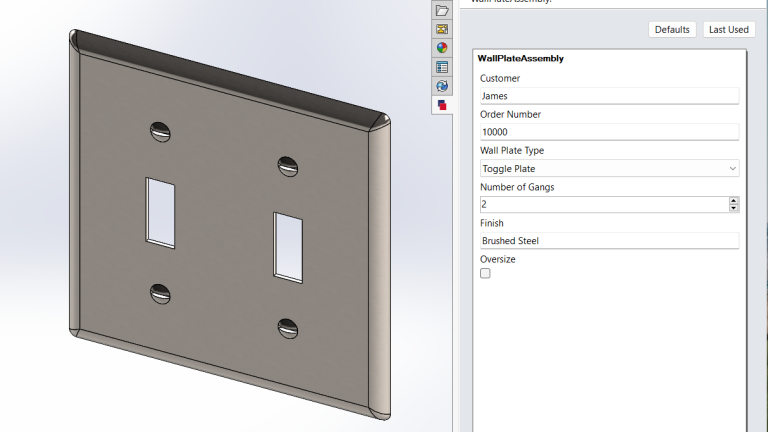
As an example, I’ve created a project that uses each type of input available in DriveWorksXpress. My model is a wall cover plate for an electrical switch or outlet. It has features to accommodate different types of switches and outlets as well as multiple devices in one electrical box.

Example of a completed form for generating a new specification
DriveWorksXpress makes it easy to design a form that will be used to configure your model. In the Form Design tab, you can add, edit, and delete input fields as well as test your form. I’ve added six inputs to my project, two of which are drop-downs.

DriveWorksXpress Form Design
My form starts with a simple Text Box for the customer’s name. A Text Box accepts any characters on the keyboard as inputs. For instance, “James” or “James & Co.” are both valid entries for a Text Box. Since I’ve already added the input fields, I’ll use the Edit button to show my setup. For the Customer text box, notice that I’ve enabled the option to make this input field required. This way, the user filling out the form cannot proceed if it is left blank. This is important since I’m using a rule that adds the name of the customer to the newly generated filenames.

Editing a Text Box input field
Next, I have a Numeric Text Box to restrict the input to numbers only for the Order Number. I can control this further with a minimum and maximum value.

Editing a Numeric Text Box input field
After the basic customer info is entered, the user will start selecting parameters to drive the model. It’s important to consider that a manufacturer wouldn’t want to receive an order for something they aren’t prepared to physically make. We can use a drop-down type input field to offer a fixed list of choices for the Wall Plate Type.
For example, the Toggle Plate and GFCI/Rocker Plate vary in the size of the rectangular cut and screw locations. The Duplex Plate has a different shape cut and a single screw hole in the center. The Blank Plate has no cut and the screw holes are located differently than the others. However, they are all similar enough that we can include all of the features in a single master model to be driven by DriveWorksXpress.

Editing a drop-down input field for the wall plate type
I’m using a Spin Button type input for the Number of Gangs. Gangs refer to the number of switches or outlets that can fit in the box the plate will cover. In my master model, a linear pattern feature is used on the cuts. The number of instances for the pattern is driven by the value returned on the form for Number of Gangs. SOLIDWORKS would have no problem creating a pattern for any number of instances, however, I’ve restricted the maximum value to 10 gangs to be practical.
A Spin Button has the same parameters as a numeric text box with the addition of an increment value. To set a value on the form, the user will interactively click arrow buttons to increase or decrease the value rather than simply type in a number.

Editing a Spin Button type input field for the number of gangs
The next type of input field on my form is another drop-down menu. In this case, it’s used for the finish. A fixed list of available finishes is entered as options. I can drive the value from the Finish input field into a SOLIDWORKS Custom Property of the part model and display it on the drawing.

Editing a Drop Down type input field for the finish
Lastly, I’ve put a Check Box type input field on the form to specify a larger than standard wall plate. A checkbox simply returns a Yes or No value. It can also be thought of as an On/Off, True/False, or 1/0 type of value. When this checkbox I’ve called Oversize is enabled, a rule in the project increases the overall dimensions of the part model.

Editing a Checkbox input field
The Test button displays how the form will look when creating a specification. In Test mode, the user can interactively try entering values and selecting from the drop-downs to ensure everything is working as expected. The Set Defaults button allows certain values to be set as defaults for new specifications. Required input fields will be highlighted with a warning symbol until a valid value is entered.
I’m leaving Customer and Order Number blank for their default values, but when a new specification is created the user won’t be able to proceed until filling in these values.

Testing the form and setting default values
Once satisfied with your form, the next step is to link it to parameters in the captured model(s).
DriveWorksXpress Setup Overview Video
For a complete overview video of using DriveWorksXpress, demonstrating the 4 steps to automation, watch the video below.
- Capture parameters in SOLIDWORKS
- Build UI (Form)
- Create Rules
- Run your configurator.
When the project is complete, it’s ready to Run! For convenience, just above the form, there are two buttons. One is to load the default values that were defined earlier and the other is to load the values from the last specification.

Run DriveWorksXpress
DriveWorksXpress is the entry-level product integrated into all seats of SOLIDWORKS. To take it further, check out DriveWorks Solo or better yet DriveWorks Pro! Learn more about DriveWorks software »