If you are designing multibody SOLIDWORKS parts with mixed units, both imperial and metric, you need a way to accurately display the information in a cut list.
You can manually change some values by typing over them and breaking the link to the model, or by creating a new column to add the values manually. But what about keeping the values linked?
How SOLIDWORKS Tables Work
In tables, such as Bill of Materials or Weldment Cut Lists, SOLIDWORKS is able to pull information from the models and have the values linked to tables within the drawings. SOLIDWORKS’ ability to update the charts automatically with design changes is incredibly useful, so we are going to look at how to show both imperial and metric units without breaking the link to the values in our table.
How to Set Up Mixed Units in SOLIDWORKS
For this example, we will be working with a cut list where we need to have one piece cut using imperial and the rest in metric, and to keep the values linked. To do this properly, we will make use of equations and variables.
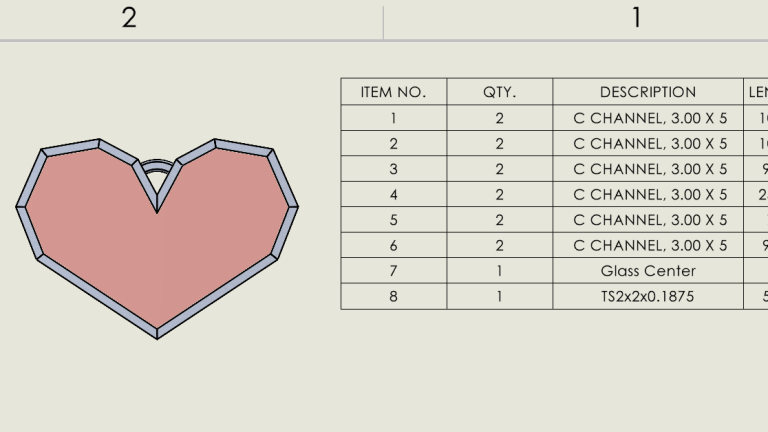
I have made a very simple heart-shaped weldment with a central glass panel to generate our cut list in a part file set to inches. However, the arc used to hang the heart needs to be measured in millimeters.
 The original multibody part in inches
Creating Global Variables
To start, we need to go to our part files and create a global variable for the length of the weldment. To do this, I will go to Tools > Equations and create a variable called “Arc”.

Creating a global variable for the arc length
To create the correct measurement, start by selecting the dimension (in this case, it is D2@Sketch18 that equates to 5.04 in). Now we need to add the formula for our conversion. 1 inch is 25.4 mm, so I will multiply the value by 25.4 to get 128.04 mm.
Updating the Cut List Properties
Now that the global variable is set up, we need to update our cut list properties. Right-click on one of the cut list items and go to Properties.

Opening the SOLIDWORKS cut list properties
SOLIDWORKS does not allow us to edit the default properties (except for Description), so we will create a new one. With the item we want to update selected, I will create a new property name called “MM Length”.
To create our linked value in the Value/Text Expression column, I will choose my global variable “Arc” from the dropdown menu, hit enter, and then type my units “mm”.

Creating the mixed units in the cut list
Repeating for the Other Mixed Units
With our cut list custom property set up, we now need to create the custom length property for all of the items. They can be set to the same expression as the original length, then type in the units.
Showing Mixed Units in a SOLIDWORKS Drawing
With the cut list properties updated in the SOLIDWORKS part, the tables in the drawings need to be updated to show the custom properties. Without doing this, the units will still reflect the document properties.
Adding the Custom Property to the Cut List
Open the drawing and click on an existing table to begin editing, then click on the column letter above “LENGTH” to edit the column variables. On the PropertyManager menu to the left, change the custom property for the cut list column from “LENGTH” to the new one “MM Length”.

Selecting the custom cut list property
There will also be an option below the property to edit the title. I removed the “MM” from my title so it will display instead as Length as is more traditional. This could be set to whatever works best for you.

Mixed units in a drawing cut list table
Verifying Associativity
Now to test the update, I am going to go change the sketch dimension in my part from 5.04 to 6 inches. I exit my sketch, rebuild my part, and jump back into the drawing. After the drawing rebuilds, my length for Item 8 has updated to 152.4mm.

Updated values after changing the part value
Now we can display just one item (or more) in the cut list as a different value without breaking the link to the part’s dimensions.
What if the Units are Overridden in the Part Dimension?
Overriding the dimension units in the dimension property menu will result in the dimension displaying in millimeters, but even after rebuilding, we can see, the global variable is reading it in the document units. As a result, the cut list properties will do the same.

Cut list properties with overridden units
The equation only breaks if the document properties are changed to MMGS. If that happens, deleting the calculation from the equation to remove the conversion factor will restore the length in the tables.
To learn more about SOLIDWORKS Weldments, register for an upcoming training course here.
Berita Terkini
Berita Terbaru
Daftar Terbaru
News
Berita Terbaru
Flash News
RuangJP
Pemilu
Berita Terkini
Prediksi Bola
Technology
Otomotif
Berita Terbaru
Teknologi
Berita terkini
Berita Pemilu
Berita Teknologi
Hiburan
master Slote
Berita Terkini
Pendidikan
Resep
Cek Ongkir Cargo
Togel Deposit Pulsa
Daftar Judi Slot Online Terpercaya
Slot yang lagi gacor