SOLIDWORKS assemblies make it easy to show how components may look and move in a real-world environment. Before finalizing mates and alignment, you may need to rotate components in your assemblies to simplify downstream workflows.
This article will explain the different ways possible after a part or subassembly has been inserted into a top-level assembly.
How to Rotate Components in SOLIDWORKS
Rotating components in SOLIDWORKS assumes the part or subassembly is not fixed, and there are no acting mates on the component restricting it from rotating. Although there are multiple ways to rotate components in SOLIDWORKS assemblies, there is one method that stands out above the rest.
Using the Right Mouse Button
The quickest way to make sure an object will mate in position as expected is by using the right mouse button. This is the clear-cut best way to rotate a part in an assembly for ease of use.
To rotate a part in an assembly with this method, right-click and hold a part, then start moving the mouse. This moves the part like SOLIDWORKS would move the screen if a user were to use the normal view rotation tools. This technique makes it easy to align the part as close to the mated position as possible.
Using the Rotate Component Command
The Move and Rotate Component commands are the second way to rotate parts in an assembly. These tools are accessed in the Assembly tab of the SOLIDWORKS Command Manager under the Move Component selection or in the Tools menu.
 Accessing the Rotate Component command
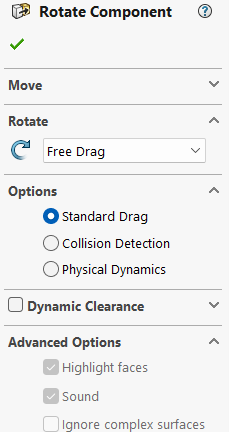
Using this method, users can begin in Rotate Component or jump into it from Move Component by toggling in the Property Manager. There are options that allow users to do a standard drag, collision detection, or physical dynamics. SOLIDWORKS also built in the ability to do dynamic clearance.

The Rotate Component Property Manager
Rotating Components During Insertion
When inserting parts or subassemblies using the Insert Component command, users can push the tab key before the component is dropped in place in the graphics area. The Insert Component command can be found in the Assembly tab or in Insert > Component > Existing Part/Assembly.

Insert Component command with a document selected
This rotates the part into different positions that may allow it to sit in a more accurate position from the time the component is placed.
Using Intuitive SOLIDWORKS Workflows
Rotating components in SOLIDWORKS assemblies is an intuitive and powerful way to speed up the mating process. Whether users are looking for a quick right mouse button to align references or a more complex collision detection, SOLIDWORKS provides the options to show how parts or subassemblies fit and interact together.
By understanding these different rotation methods, users can work more efficiently, reduce mate errors, and build assemblies that come together smoothly from the start. Try aligning your components with one of these methods, and get in touch with us if you require more assistance.
To learn more SOLIDWORKS tips and tricks, sign up for our bi-weekly Tech Tip newsletter here.
Berita Terkini
Berita Terbaru
Daftar Terbaru
News
Berita Terbaru
Flash News
RuangJP
Pemilu
Berita Terkini
Prediksi Bola
Technology
Otomotif
Berita Terbaru
Teknologi
Berita terkini
Berita Pemilu
Berita Teknologi
Hiburan
master Slote
Berita Terkini
Pendidikan
Resep
Cek Ongkir Cargo
Togel Deposit Pulsa
Daftar Judi Slot Online Terpercaya
Slot yang lagi gacor