Aside from basic sketch tools, knowing how to dimension holes is a fundamental SOLIDWORKS skill. Without dimensioning holes, models lack design intent and leave out critical manufacturing information.
With any part, there are multiple ways to add holes and apply dimensions. The two most common ways to dimension a hole are to use the SOLIDWORKS Hole Wizard or to use basic sketching tools to do a Cut Extrude.
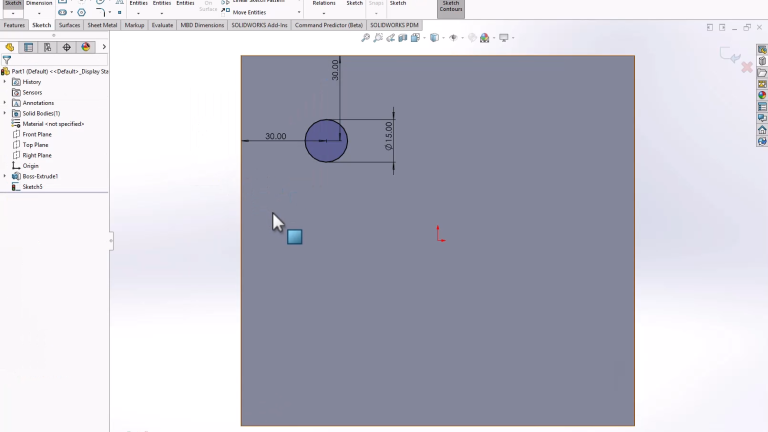
Dimensioning Holes with a Cut Extrude
The most basic way to dimension holes in SOLIDWORKS is with a Cut Extrude from a circular sketch.
- Create a circular sketch and enter the desired diameter of the hole.
- Add dimensions to the center point of the circle to locate the hole.
 Dimensioning a hole on a part
 - Use the Cut Extrude command to cut the hole through the entire part.
 Extruding a hole through the entire part
This method is best used for simple holes that don’t need a lot of manufacturing information. For example, simple drilled or laser-cut holes can benefit from this lightweight workflow.
However, if you require thread information or deeper control over standard sizing, use the next method.
Dimension a Hole with the Hole Wizard
The more advanced method to dimension a hole is to use the Hole Wizard. This method allows for the selection of standard sizing, thread information, and tolerance information.
- Launch the Hole Wizard from the Features tab of the Command Manager.
 Opening the Hole Wizard
 - Switch the Position tab and use sketch points to locate the hole on the model. At this stage, you can use normal sketch and dimensioning tools.
- On the Type tab, you can select what hole type you require.
- The Standard and Type are defined by the library and recognized hole standards.
- The Size and Fit are determined by the above selections and confirmed by recognized standards.
- The End Condition determines the depth of the hole.
- Additional options are available to detail clearances and display.
 Specifying hole standards in the Hole Wizard
- Click the green check mark to confirm the hole.
The Hole Wizard is useful with multiple complex holes that would be tricky to define with standard sketch tools. This will create a feature in the SOLIDWORKS tree, making it easy to change values afterwards.
How to Dimension Holes in Drawings
Now that the two methods to create and dimension holes have been covered, it is important to know how to add the dimensions to a drawing. The dimension information is stored with the holes in the model, so all that is needed is a callout to use the information.
On the Annotations tab of the Command Manager, you can use the Hole Callout command to add information about the hole. With the command active, you can select an edge associated with a hole to generate the callout.

Using the Hole Callout command
Depending on the type of hole selected, the callout will include different information.
- For Cut Extrude holes, the callout will include the diameter and the depth.
- For Hole Wizard holes, the callout will include any associated data, including countersink depth and diameter, threading information, and other information.

Hole callout information shown on a drawing
Best Method to Dimension Holes in SOLIDWORKS
Dimensioning a hole in SOLIDWORKS can be done in a few different ways, but no matter what you choose, the information is available in the drawing. This provides a single source of truth, going back to the model, allowing for the most accurate product manufacturing information available in the drawing.
The best method ultimately comes down to the type and quantity of holes you need, along with the required information in a drawing.
- For a few simple holes, go with a Cut Extrude.
- For multiple complex holes, go with the Hole Wizard.
For additional best practices and tips, subscribe to our Tech Tip Newsletter here.
PakarPBN
A Private Blog Network (PBN) is a collection of websites that are controlled by a single individual or organization and used primarily to build backlinks to a “money site” in order to influence its ranking in search engines such as Google. The core idea behind a PBN is based on the importance of backlinks in Google’s ranking algorithm. Since Google views backlinks as signals of authority and trust, some website owners attempt to artificially create these signals through a controlled network of sites.
In a typical PBN setup, the owner acquires expired or aged domains that already have existing authority, backlinks, and history. These domains are rebuilt with new content and hosted separately, often using different IP addresses, hosting providers, themes, and ownership details to make them appear unrelated. Within the content published on these sites, links are strategically placed that point to the main website the owner wants to rank higher. By doing this, the owner attempts to pass link equity (also known as “link juice”) from the PBN sites to the target website.
The purpose of a PBN is to give the impression that the target website is naturally earning links from multiple independent sources. If done effectively, this can temporarily improve keyword rankings, increase organic visibility, and drive more traffic from search results.