Templates in SOLIDWORKS are the foundational aspect of every design you create. Without templates, your files wouldn’t know which unit system to use or which font to use for text.
Custom SOLIDWORKS templates allow your organization to define its standards and ensure that those rules are followed on every part. Fortunately, creating a new template in SOLIDWORKS is straightforward with only a few key considerations.
What are SOLIDWORKS Templates?
SOLIDWORKS has three main file types that you use depending on what you are trying to create. Part files let you create individual mechanical parts that eventually go into an assembly file to check form, fit, and function. Ultimately, both the part and assembly files are distilled down to drawing files where manufacturing information is displayed in a 2D format.
 SOLIDWORKS templates when you create a new file
When you create a new SOLIDWORKS file, it will use a template to determine the standard information and settings for that file. Unit settings, fonts, custom properties, and even starting geometry can be defined in a SOLIDWORKS template.
SOLIDWORKS generally uses three template files when you are working:
- .PRTDOT for part files
- .ASMDOT for assembly files
- .DRWDOT for drawings
Drawings also have a sheet format (.SLDDRT) that can control some aspects of the drawing. For more information on the difference between a drawing template and a sheet format, watch our Video Tech Tip.
Where are Templates in SOLIDWORKS Stored?
The first questions we need to ask are: where are our templates saved, and how do we point SOLIDWORKS to that folder? It is best practice for everyone within the same company to share file templates, so they are typically located on a shared drive, but they don’t have to be.

The two locations for templates in SOLIDWORKS
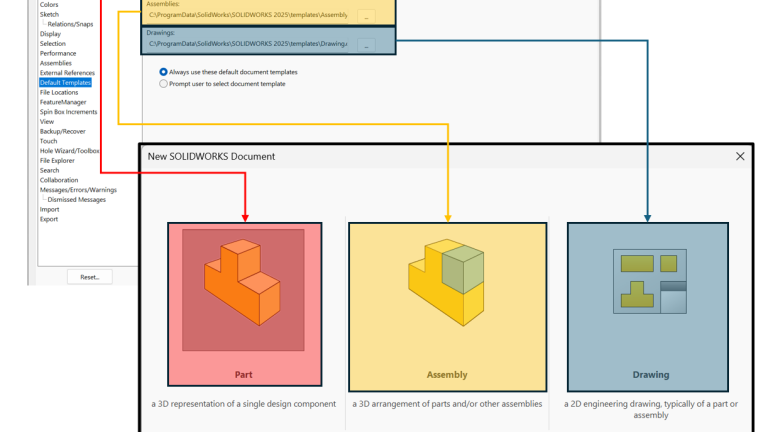
To see where SOLIDWORKS is looking for templates, open the System Options. Inside the options, the Default Templates and File Locations section will provide insight into storage locations.
Default Templates
The Default Templates will show which available templates are used by default. These are used when creating a new file in Novice Mode or when creating a virtual component in an assembly.

The default SOLIDWORKS templates and their corresponding Novice location
File Locations
In File Locations, you have additional options and information about not only file templates, but also other templates all across SOLIDWORKS.

SOLIDWORKS document templates in the System Options
To choose what templates will show up when creating a new SOLIDWORKS file:
- Open the SOLIDWORKS System Options.
- Select the File Locations tab.
- In the drop-down menu, select Document Templates.
- Add, delete, or reorder folder locations where SOLIDWORKS templates reside.
Creating a SOLIDWORKS Template
Now that we know where to save the template files, we will start creating a new part template by opening up a new SOLIDWORKS part file and saving it as a .PRTDOT file in the template folder. From here, you can customize many aspects of the template to tailor it specifically to your company’s specifications.
Document Properties
These Document Properties will stick to the file, so any option I make in this menu will follow all the new parts I create using this template from now on.

SOLIDWORKS Document Properties menu
While creating a template, you should walk through every menu in this to choose what you want your template to look like, but some of the most important will include:
- Dimensions: Choose your decimal precision for dimensions in the top level, then in the tabs beneath, we can change the individual dimensions for things like angular, linear, and diameter.
- Units: Change the SOLIDWORKS unit system into millimeters, inches, or other systems as you require.
- Image Quality: Decide how many graphics triangles SOLIDWORKS will render when creating a part. It is highly recommended that you keep your template resolution low to increase performance with no effect on the final part.
Custom Properties
Once you have selected all your document-level settings, we can now look at adding custom properties. This is an optional step, but creating Custom Properties allows us to add metadata to your part file that we can use in other places.
For example, custom properties for description from part files can be used when you create a bill of materials in an assembly file to fill in a description column. Another area where this is important would be in drawings, where you can use custom properties to fill out title blocks.

Editing SOLIDWORKS Custom Properties
Custom Properties are a very powerful tool for metadata, and there are multiple ways we can use them or have our users fill them in. For more information on this, check out our Drawings course, where we go over exactly how to fill out this information.
Other Customizations
The power of having these templates is that anything that is saved in the template will pop up when we create the new part file with it. So you can create extra reference geometry, starting sketches, or entire features, and every time the template is used, those custom items will appear.
Ensuring SOLIDWORKS Success
Once the template is customized, save it and test it! After creating a new SOLIDWORKS file, ensure that everything is functioning the way that it should.
If, after using the template, things aren’t working the way they should, go back to edit the template and retest. However, a perfectly working template is a bit trickier than one would expect, so we are here to help you through technical support, care visits, or further training.
To schedule a free Client Care Visit to explore options for creating SOLIDWORKS templates, click here.
PakarPBN
A Private Blog Network (PBN) is a collection of websites that are controlled by a single individual or organization and used primarily to build backlinks to a “money site” in order to influence its ranking in search engines such as Google. The core idea behind a PBN is based on the importance of backlinks in Google’s ranking algorithm. Since Google views backlinks as signals of authority and trust, some website owners attempt to artificially create these signals through a controlled network of sites.
In a typical PBN setup, the owner acquires expired or aged domains that already have existing authority, backlinks, and history. These domains are rebuilt with new content and hosted separately, often using different IP addresses, hosting providers, themes, and ownership details to make them appear unrelated. Within the content published on these sites, links are strategically placed that point to the main website the owner wants to rank higher. By doing this, the owner attempts to pass link equity (also known as “link juice”) from the PBN sites to the target website.
The purpose of a PBN is to give the impression that the target website is naturally earning links from multiple independent sources. If done effectively, this can temporarily improve keyword rankings, increase organic visibility, and drive more traffic from search results.