When designing sheet metal parts in SOLIDWORKS, the Form tool allows you to create shapes and features that are to be manufactured with a press or punch-style tool. This feature allows you to add more complex shapes and features, such as vents, louvres, flanges, and key holes, directly into their designs.
The Form tool can be a great addition to your arsenal and make you a more efficient SOLIDWORKS modeler. We’ll discuss the tool while adding features to a standard metal electrical enclosure.
Why Use the Form Tool?
The Form tool in SOLIDWORKS enables the creation of realistic, manufacturable features like louvres, flanges, and embossments in sheet metal parts. These features are essential when designing functional parts such as enclosures that require ventilation, cable routing, and mounting options for hanging on a wall, or even places to add additional hardware.
The command simulates the way you would use a die to press a shape into sheet metal, getting your design intent as close as possible to the final manufacturable part. This emulates the way that sheet metal manufacturers use dies and presses.
How to Use the SOLIDWORKS Form Tool
SOLIDWORKS provides a set of default forming tools inside the Design Library and can easily be dragged onto the sheet metal part. Form tools are saved and referenced in the Design Library. This is helpful for reusing the same tools from project to project, so you don’t have to recreate the tool every time you go to create the formed feature.
- Open the SOLIDWORKS Design Library.
 Accessing the Form tools in the Design Library
 - Drag a forming tool from the library onto your sheet metal part.
 Dragging a form from the library onto the model
 - Specify the placement of the feature. This can be done with either reference sketches or dimensions.
- Specify the rotation and orientation of the formed feature.
- Confirm the placement and accept.
There are many different types of form tools provided by default, all of which can be opened and customized if need be. You can place and locate multiple instances in one step or use a feature pattern to duplicate the formed feature across the model.
How to Create Custom Form Tools
SOLIDWORKS also allows for the creation of custom form tools. If you have a specific geometry you wish to use or some existing dies you want to represent in your design library, you can create those with SOLIDWORKS CAD and then save them as a Form Tool file (.SLDFTP). After creating a custom form tool, it will be accessible from the drag-and-drop Design Library.
To create a custom form tool:
- Model the geometry of the die you want to use or download it from a 3rd party site. Ensure to add in Split Lines to represent areas that will be punched out and a stopping face.
- Open the Form Tool Property Manager from the Sheet Metal tab of the Command Manager.
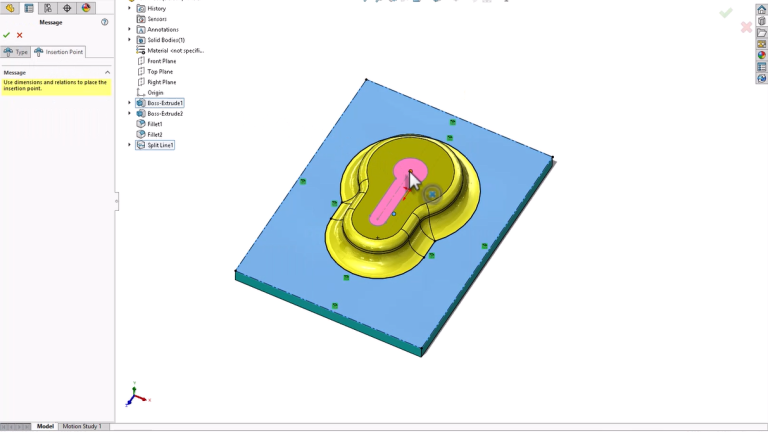
- Define the stopping face, punched-out areas, and insertion point based on the model created.
- Save the file as a .SLDFTP file in a location accessible from the SOLIDWORKS Design library

Creating a custom form tool
Introducing the SOLIDWORKS Stamp Tool
SOLIDWORKS 2024 introduces the Stamp tool, a new feature that simplifies the creation of embossed or indented features without requiring a pre-made form tool. This time-saving enhancement means you don’t need to manually create the forming bodies and can instead use a sketch.
To use the SOLIDWORKS Stamp tool, follow these steps:
- Create a sketch that has your desired stamp or formed shape
- Preselect the sketch and activate the Stamp tool from the Sheet Metal tab of the Command Manager.
- Define the necessary parameters, including die, punch, and profile radii.

Using the new Stamp tool in SOLIDWORKS
This tool is ideal for adding indentations for labels or mounting accessories. This saves you time and steps of creating a custom forming tool, enabling you to quickly finish designs with fewer steps.
Extending SOLIDWORKS Usability
The Form Tool in SOLIDWORKS is a powerful feature that enhances both the design process and the manufacturability of sheet metal parts. Whether using provided form tools, creating custom ones, or leveraging new features like the Stamp tool, designers can achieve complex, production-ready results with ease.
To get more time-saving tips delivered to your inbox, sign up for our Bi-Weekly Tech Tip newsletter here.
Cloud Software
Berita Olahraga
Lowongan Kerja
Berita Terkini
Berita Terbaru
Berita Teknologi
Seputar Teknologi
Berita Politik
Resep Masakan
Pendidikan